Nirvana adventures basic Paragliding course experience
I had only done tandem paragliding earlier. [Detailed experience here] In tandem, all
controls are done by the instructor, as a guest we only sit and enjoy the
flight. But sitting in passenger’s seat is not my idea of traveling- if there’s
an opportunity to drive/ride/fly myself, I am always eager to try it. I always
prefer to rent a car and drive myself, than hiring a taxi. Paragliding was no
different. When I was offered an opportunity to try a 4 day elementary course
in paragliding by Nirvana Adventures, I went for it.
 Nirvana Adventures have completed two decades of operations in Kamshet, training thousands of students, supporting local community and nourishing the sport of paragliding. Nirvana operates out of its base called Native Place [Detailed review here, FAQs here]

 Above: With Ganesh, who's been with Nirvana for over 8 years now
Below: With Sandeep sir, who is a senior instructor with Nirvana with over 11 years of experience


Upon confirmation of the course registration Nirvana sent
detailed instructions on how to reach Native Place. While stay at Native Place
is covered under course fees, reaching there is not. After deliberating various
options like Taxi, I finally opted to rent a bike. Details of my Pune bike rental experience available separately in this post.
Day 01:
Reached Native Place from Pune at around 11.30 (target was 11 AM, got
late a bit). Another student from Kolkata had reached previous night. Did a
quick fresh up and our first session began, which involved filling up some
forms, watching introduction videos. The session lasted about 30 minutes after
which we were free. Soon lunch was ready and the bell was rung. Post lunch slept
for an hour. We were to head out to the hills in the afternoon for practical
sessions. Apparently one of the instructions was to bring a full sleeve shirt,
which I totally missed. Because of this I had to survive next 4 days with half
sleeve T shirt exposing my forearms to direct sunlight.
Around 3 PM we prepared to leave. Each student will be
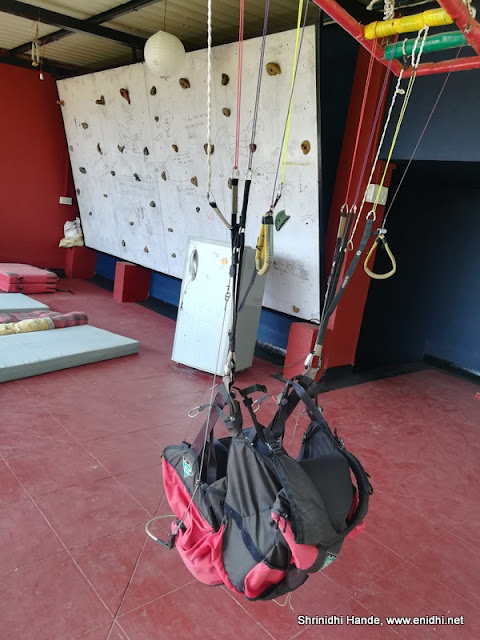
assigned a kit that weighs about 10-12 kgs and contains the glider, harness and
the bag. Besides this we are required to carry enough water (around 2 litres). The
glider comes in different specifications- primarily based on weight of the
student, thus it is not advisable to mix and match. A wrong weight & glider
combination can severely affects the flying distance. Gliders are also made to different specifications- beginners, advanced, solo/tandem, competitions etc. Ozone and BGD are two prominent brands whose paragliders are used extensively by flying schools such as Niravana. These gliders cost in the range of 2000-4000 USD per unit (1.4 to 3 lakh rupees) A helmet and radio is
also assigned to each student.

We left in Nirvana’s van to the hills. 3 students and about
5 staff. Drive took about 30 mins. The hills where practice session is done is
called Sheriar hills. As soon as arrived, a group of boys surrounded the van- these
boys offer to work as porters for a small fee, hauling paragliding equipment
uphill. I’ve written about them in detail in a separate post here.
My day 01 training was to learn about the equipment and
practice forward take off and landing. The glider has a leading edge and a
trailing edge. Leading edge should be on top (or front) while taking off. The
glider has several pockets with internal holes, designed to hold and re-distribute
air below the canopy in a uniform way. The glider needs to be inspected at regular
intervals-there’s a maintenance inspection once in several months or after a
hard landing, there’s daily inspection and there’s a pre-flight check.
The canopy is connected to harness using a series of ropes,
known as risers. There’re 3 sets of risers on each side, A B and C. Raisers are
made using strong materials such as Kevlar and can sustain great deal of abuse.
C is the outermost one, pulling which will raise the leading edge, causing
inflation. It is important to connect risers in the right fashion and ensure
that they are free and don’t entangle each other and don’t have any damage. There is also a set of brake cords, which
when pulled down reduce surface area of the canopy, this reducing lift and
bringing it down.
The harness has a hard bottom- in case a student scrapes the
ground during landing this hard bottom will absorb the impact. Harness also
gets a pouch to store the bag and has provision for an emergency parachute
(which wasn’t used during the elementary course, since we will not be flying
high enough for parachute to deploy).
Next step was to learn how to inflate the glider. For this,
student needs to complete a pre-flight check- that all risers are straight without
a mix up, the harness is safely secured, planned flying path is clear and wind
direction is favorable. Take off is always done preferably in head wind. Take
off in cross wind is possible but needs some more effort. Take off is NOT
possible in case of tail wind (wind pushing from behind. To take off, we wait
for right wind and clear path, will the C Risers to raise the canopy, bend
forward, move our arms behind and run to gain momentum (this is after taking
take off permission over radio). Day 01 training doesn’t involve flying, so we
will only practice forward take off and landing. Landing involves pulling the
brakes fully and turning around (to ensure that we can control the canopy
better and resist being carried away by wind. Upon landing we need to round up
the riser wires and collect the canopy, an activity known as mushrooming. A
student is required to mushroom and carry the glider back to starting point,
for another round of take off and landing practice. Each student is assisted by
two staff at take off point, who will ensure that pre-flight check is really
done safely and guide the student on right body positions and hand movements. A
3rd instructor guides the student over radio, monitoring his actions
from a distance, closer to landing point.
On day 01, this forward take off, land, mushroom and repeat
is done dozens of times. In fact this is the only training for day 01, as it is
important for student to learn the take off and landing controls which are
extremely crucial. Flying is the easy part. If take off/landing goes wrong
there is very high chance of injury.
At around 6.30 PM daylight began to fade and packup was
declared. We got back into the van and returned to native place. Had dinner and
slept.
Day 02: Did some exploration around Native place in the
morning. [Details in separate post]. At about 11 AM we had theory classes,
which included watching videos of small take offs and landing, flying positions
etc. There was a simulator harness on which we could practice further. Today’s
practice is called Bunny hops (just like how rabbit jumps a small distance and
lands). Bunny hop begins from a point slightly higher uphill compared to day 01.
We do the pre-flight check, take permission, run and lift off, get to flying
position and within few seconds it is time to land. As we near the ground (4-5
feet) we need to lean forward, wait for our legs to touch the ground, pull down
the brakes hard, run a few steps upon touch down, turn around and bring down
the glider and mushroom it.

Whole of Day 02 this bunny hop was repeated, I did around
12-15 times during the 2-3 hour session. Number of flights we can take is a
function of several factors- crowd on the hills (students from multiple flying
schools use same venue), how much rest we wish to take in between flights, how favorable
is the wind etc. Feedback on my flight, mistakes I did was repeatedly conveyed
to me by the instructor, so that I improve next time. Learning paragliding is
not a competition. Students are not supposed to compare themselves with others
and feel good or bad. Each flight is unique, due to nature of wind and controls
exercised by the student. Flying longer is NOT the objective- many times felt I
might glide a bit further but had to touch down earlier-taking off and landing
correctly is the crucial aspect of any flight. Getting hand position right, learning to feel the air, sense the direction of pull and plan corrective action are critical aspects. If you have fear of heights, you will hesitate
to take your foot of the ground, but once you learn to trust the equipment and
get a feel of flying, those few seconds spent in air will be the most
pleasurable moments.
Watch a short video of my bunny hop below [Watch on Youtube]
Watch a short video of my bunny hop below [Watch on Youtube]
I was suggested not to use GoPro on day 01 and 02, as this
causes 2 concerns- 1. Student’s attention will be on camera, not learning
controls, 2. There’s a risk of wires (risers) getting entangled in camera setup
causing additional risk.
Once back in Native place, it was communicated that next day
session will be in the morning. We watched videos for next day’s session- solo
flights, impact of types of wind and windspeed on flying distance etc. In the
simulator we practiced making left and right turns. Learnt about pitch, yaw and
tilt movements. The glider acts like a pendulum with paraglider’s weight at the
centre, creating a centre of gravity slightly above person’s head. Shifting
body weight will aid in turning, along with using brakes to tilt the gilder. We
practiced making 90 and 180 degree turns. Gliders typically have a ration of
6.7: 1 or for every 6.7 meters of forward motion, glider drops 1 meter in
height. This can increase or decrease based on wind direction, any air pockets
etc.
Day 03: This was the most hectic day of my 4 day course.
Early morning at about 7 AM we left for Shinde hills, a location beyond Kamshet
on the other side of Old Mumbai-Pune highway. Once reaching the spot we had
breakfast and climbed up the hill to prepare for solo flight. We were to run
from the hill top, fly straight, then turn left, then turn right and land in
the open area below. The first flight was lots of fun, but flights from Shinde
hill last just about a minute. I did 3 solo flights in the morning, assisted by
Ganesh, Sandeep and others from Nirvana Paragliding.
Some enterprising local women sold buttermilk for Rs 20 a
cup, which was good to have after exhausting our drinking water supply. I had
actually enriched my water with the tender coconut powder, which gave me little
more energy than plain water. I recommend you carrying your own glucose or
other refresher.
We came back to Native place after a shopping break at
Kamshet town (where staff bought daily goods). Instructors decided that evening
weather was perfect too and we can do one more practice session. Thus post
lunch, again at 3 PM we left for the hills- this time not to Shinde hills but
shelar hills that we had visited on Day 01 and 02. I did 4 solo flights this
time, each lasted 2-3 minutes, thanks to relative heights of this hill compared
to Shinde hill.
Day 3 being a Saturday had lots of tandem flight customers.
Day 3 being a Saturday had lots of tandem flight customers.
I made some videos using GoPro-but there were some problems.
- None of the helmets had GoPro mount, so I couldn’t mount on helmet.
- Chest mount couldn’t be used as radio takes that space.
- Headmount again intrudes with helmet hence can’t be used
- Wrist mount is tricky has risers need to pass on your arms during take off- having a camera there could create problems.
- A clip mount that can position the camera somewhere on the shoulder would have been great but I didn’t have any.
- Eventually I made a few videos with GoPro mounted on my leg. Tried once mounting it on my shoulder but it lost orientation during flight as I had not strapped it strong enough.
You can watch the video below for a 14 minute footage of my
various paragliding activities [Watch on Youtube here]
End of each day we also update log book and update
documentation about what was completed that day.

Below: With Sandeep sir, who is a senior instructor with Nirvana with over 11 years of experience

Day 04
The final day of the course- as per schedule I was to give
an exam. I gave the test in the morning- scored 18
out of 20. My certificate was also given.

Since weather was favorable in the morning, team decided to practice in the morning at Shinde hills. I figured out that I can save 2 hours if I check out and go there with my bike and bag- after practice session I can leave directly for Pune, instead of having to come back to Native place and leave again. Instructors agreed for this. Checked out and left with bike. Did four more solo flights on the last day, had breakfast, filled log book and got supervisor signature, bid goodbye to FlyNirvana team and left for Pune, marking an end to a wonderful experience.
What have I learnt now?
I know how to do forward launch, how to navigate- turn left/right etc and land safely. However, during launch I was always assisted by staff- haven't done totally independent launching. Reverse launch is another technique, which will be taught in intermediate level. All my launches are under supervisor and guided by radio instructions- haven't done a launch when other pilots are also in the air- meaning, haven't practiced collision avoidance (though I know in theory what needs to be done) or doing entire flights on my own at my own discretion without guidance. All these are for future courses.
My personal tips if you're signing up for Nirvana's Paragliding courses:
- Carry some glucose/electrolytes for use during outdoor activity- will be bit more comfortable
- Take your spouse/family along even if they are not doing the course- Native Place is a nice campus to relax and it will be good holiday for them.
- Take whatever you need for 4 days- coming back to town won't be very convenient.
- If possible carry a helmet with GoPro mount-I feel helmet mount is best option if you wish to capture video
You may have some questions about the paragliding course- I've tried to answer them in a separate post here. Do read, feel free to ask if there're some questions unanswered.


Great experience, Watched your videos.
ReplyDeleteBest wishes.